Instructions
Note – If you are not familiar or not comfortable with bicycle drivetrain maintenance you may wish to consult your local bike shop for installation.
IMPORTANT
First check the 4 digit date code laser etched on your OneUp Sprocket. This will either be **13, or **14, depending on when it was manufactured.
For date codes **13 click here for assembly instructions
For date codes **14 & **15 click here for assembly instructions
Detailed Installation Instructions
- Check our compatibility page to make sure your desired setup is approved
- Remove the existing cassette from your wheel. Detailed instructions
- Remove the stock 17T sprocket and one spacer from your cassette (these will not be reinstalled)*
- Install the OneUp Components 40T or 42T sprocket and OneUp spacer(s) onto the freehub body in the correct order
- Install all remaining cassette sprockets and spacers (excluding the 17T and one spacer)*
- There should now be 10 sprockets on the freehub body
- Check that the 10 sprockets are evenly spaced. If they are not, it is likely that a cassette spacer was missed or an extra one was added.
-
Reinstall the cassette lockring and tighten it to the noted torque
* If you have a OneUp 16T sprocket follow the additional instructions below
OneUp 16T addition
- The OneUp 16T sprocket replaces the original 15T, 17T and one cassette spacer.
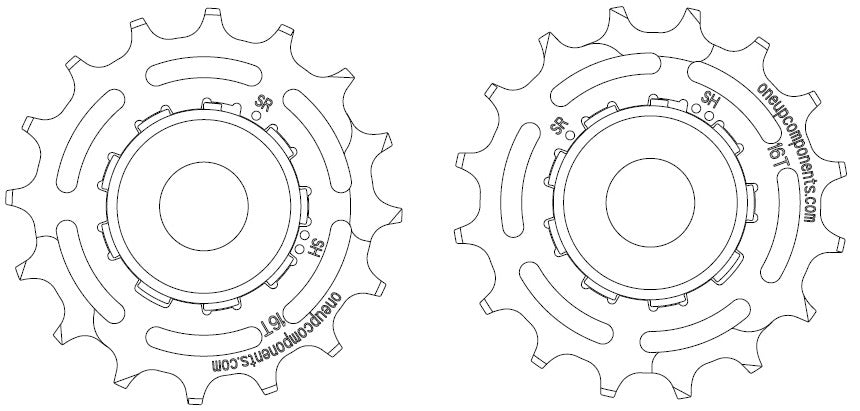
- The OneUp 16T sprocket has been designed to shift with both SRAM and Shimano cassettes depending upon how it is clocked on the freehub.
- To align the clocking correctly, place the marking that relates to your cassette manufacturer in the freehub wide tooth gap (SR=SRAM, SH=Shimano)
- All other steps of the install are the same.
SRAM Shimano
Setup instructions:
The system will be tuned the same way as standard 10 speed system. If you need help doing this we recommend visiting your local bike shop or reading a tutorial
High limit screw – It should not be necessary to adjust this screw but now is a good time to check that upper derailleur pulley is in line with the 11T cassette sprocket.
‘B limit screw’ – The B limit screw controls the distance between the largest cassette sprocket and the top pulley of the rear derailleur. Since the largest cassette sprocket is now larger, B tension will need to be added.
- Turn the B screw 2 full turns clockwise as a starting point.
- Shift into the OneUp Sprocket
- Fine tune the B screw so that the upper pulley of the derailleur sits ~5-8mm away from the OneUp 40T/42T sprocket
- Shift back and forth between the 36T and 40T/42T. Use as little tension as possible while maintaining a smooth shift.
Shimano rear derailleurs – We have found that Shimano typically uses a shorter B screw then SRAM. With some setups it may be necessary to gain extra length to get the system shifting smoothly. If you find the B screw is not long enough, try removing the B-screw, removing the plastic washer that remains attached to the screw and reinstalling the screw without this washer. If you are still having trouble, remove the B screw and thread it into the derailleur from the opposite side.
Chain length - Once the B screw is properly set, it may be necessary to adjust the chain length. Check that the chain can be shifted into the OneUp Components 42T sprocket while in the largest front chainring. The bike should still be able to go through its travel without pulling the chain tight. If in doubt, complete the following procedure.
- Wrap the chain around the largest chainring and largest rear sprocket (bypassing the rear derailleur).
- Make note of this chain length and add 4 links as shown in the picture below.

Setup Disclaimer -The OneUp Components 40T/42T sprockets are an aftermarket add-on for your existing 10 speed system. It was designed to give you 90% of the gear range benefits of 1x11 systems without the high cost of upgrade. Because of the shear number of suspension designs, rear dropout variation and possible component combinations it is not possible to comment on the shifting performance of each potential setup. We have tested many setups and have seen very good results overall. In some cases setting up the OneUp adapter requires that you adjust your rear derailleur outside of the manufacturers recommended range. Please note that OneUp Components is not responsible for damage to other drivetrain components whether directly or indirectly caused by using this product.